
How to Make AI-Generated Photos Look More Realistic
Learn how to make AI-generated photos look more realistic with simple tips for natural lighting, realistic skin, facial details, colors, and image enhancement.
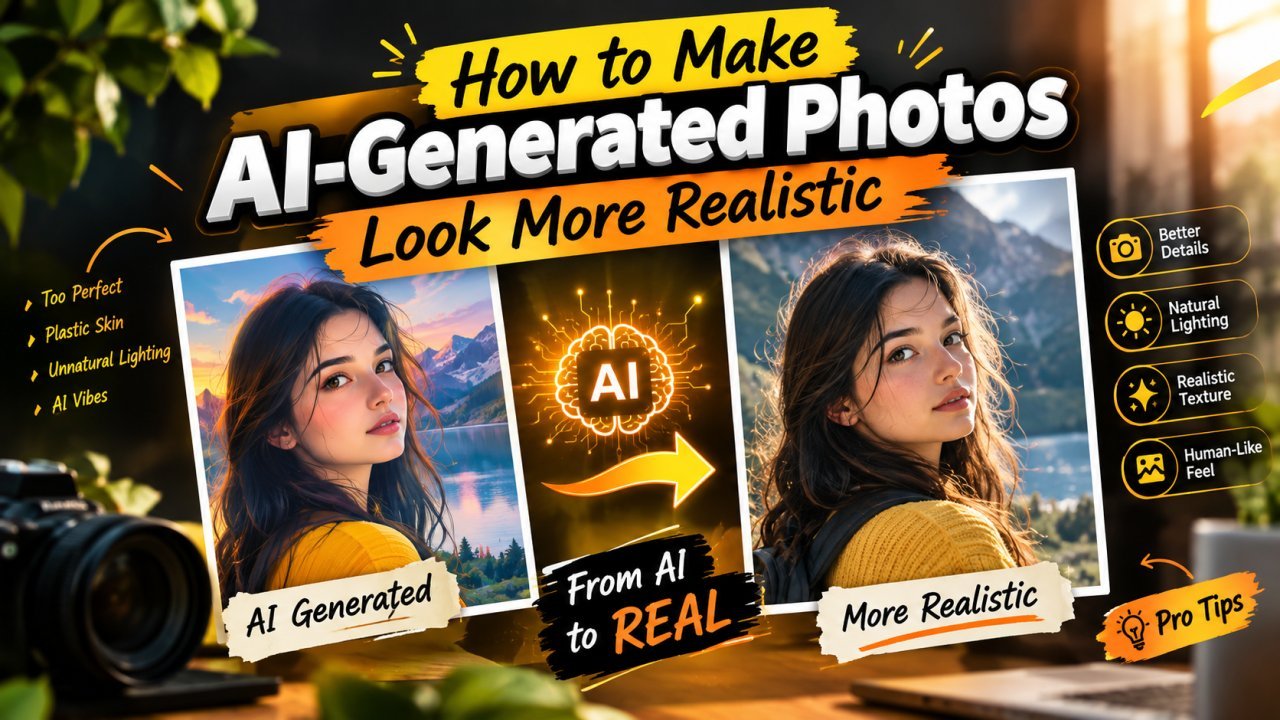
How to Make AI-Generated Photos Look More Realistic
AI-generated photos can look impressive, but sometimes they have details that make them appear artificial. Skin may look too smooth, lighting may seem unnatural, or facial features may appear slightly distorted.
If you want to learn how to make AI-generated photos look more realistic, the key is to focus on natural details, balanced lighting, realistic textures, and careful editing.
You do not always need advanced editing skills to improve an AI-generated photo. A few changes to the prompt, image composition, and editing settings can make a noticeable difference.
In this guide, you will learn how to create more realistic AI photos, improve facial details, make skin look natural, fix lighting problems, and enhance image quality without making the result look artificial.
Whether you are creating AI portraits, social media images, professional profile pictures, or creative photography, these techniques can help you achieve a more natural appearance.
What Makes an AI-Generated Photo Look Realistic?
A realistic AI-generated photo looks similar to a photograph captured by a real camera.
It usually has natural lighting, believable textures, realistic proportions, and consistent details.
However, realism is not only about making an image look sharp. A highly detailed image can still look artificial if the lighting, skin texture, or facial proportions are incorrect.
Here are the main elements that make an AI photo look more realistic.
1. Natural Skin Texture
Real human skin has small details, such as pores, fine lines, subtle color variations, and natural highlights.
AI-generated portraits sometimes have overly smooth skin that resembles plastic.
To make skin look more realistic:
- Preserve natural skin texture.
- Avoid excessive smoothing.
- Keep subtle variations in skin tone.
- Use gentle lighting instead of harsh artificial highlights.
- Avoid making every part of the face equally smooth.
The goal is to create natural-looking skin, not flawless or overly polished skin.
2. Realistic Lighting and Shadows
Lighting has a major effect on how realistic an image appears.
In real photography, light creates shadows and highlights that help define the shape of a person's face and body.
AI-generated photos may look artificial when the light source is unclear or when shadows appear in the wrong direction.
For more realistic lighting:
- Use a clear and believable light source.
- Keep shadows consistent with the direction of the light.
- Avoid excessive brightness on the face.
- Use natural-looking highlights.
- Match the background lighting with the subject.
For example, a portrait near a window should have lighting that looks consistent with daylight coming through that window.
3. Realistic Facial Features
AI-generated faces can sometimes contain unusual eyes, uneven facial details, distorted teeth, or unnatural expressions.
These problems can make a portrait look artificial even when the rest of the image appears realistic.
Pay attention to:
- Eye shape and direction.
- Natural facial proportions.
- Realistic teeth and lips.
- Consistent facial symmetry without making the face look unnaturally perfect.
- Natural expressions.
Small corrections can make a significant difference in the overall appearance of a portrait.
4. Natural Hair and Clothing Details
Hair and clothing also affect the realism of an AI-generated photo.
Hair may appear like a solid mass, while clothing may have strange folds or textures.
To improve these details:
- Use natural-looking hair strands and volume.
- Keep clothing folds consistent with the subject's pose.
- Avoid overly sharp or repetitive fabric patterns.
- Make sure accessories fit naturally.
- Check whether hair edges blend properly with the background.
These small details help make the image look more like a real photograph.
5. Realistic Backgrounds
An unrealistic background can make an otherwise convincing portrait look artificial.
Common problems include distorted buildings, strange objects, inconsistent perspective, and unnatural background blur.
To improve the background:
- Use a simple, believable environment.
- Keep perspective consistent.
- Avoid objects that appear to float.
- Make sure the background lighting matches the subject.
- Use natural depth of field when appropriate.
A realistic background does not need to be complicated. A simple room, outdoor setting, or neutral environment can work well.
Why Do AI-Generated Photos Sometimes Look Fake?
AI-generated photos can contain visual inconsistencies that are easy to notice when you examine them closely.
Understanding these problems helps you correct them more effectively.
Overly Smooth Skin
One common issue is skin that looks too smooth or polished.
This can happen when the image generation process creates an idealized appearance or when strong smoothing is applied during editing.
Solution: Use natural skin texture, reduce smoothing, and avoid excessive beauty filters.
Unnatural Eyes
Eyes can sometimes look overly glossy, incorrectly aligned, or inconsistent with the direction of the face.
Solution: Check eye alignment, reflections, eyelid details, and gaze direction.
Strange Hands and Fingers
AI-generated images may contain fingers that look distorted, merged, or incorrectly positioned.
Solution: Inspect hands carefully and use a localized correction or regenerate the image with a clearer hand position.
Incorrect Shadows
Shadows may appear inconsistent with the light source.
For example, the subject may have a shadow on one side while the background suggests that the light is coming from the opposite direction.
Solution: Use a consistent light source and correct shadows during editing when possible.
Unrealistic Hair
Hair may look too smooth, appear as a single solid shape, or blend unnaturally into the background.
Solution: Improve hair texture and check the edges around the head.
Artificial Colors
AI-generated images may have overly saturated colors, unnatural skin tones, or excessive contrast.
Solution: Reduce excessive saturation and adjust color balance carefully.
Excessive Sharpness
Some AI images look unnatural because every detail is extremely sharp.
Real photographs often contain subtle differences in focus and texture.
Solution: Use moderate sharpening and preserve natural depth and texture.
How to Make AI-Generated Photos Look More Realistic With Better Prompts
One of the easiest ways to improve AI-generated photos is to write a more detailed prompt.
A good prompt explains what the image should look like, how the subject should be positioned, what kind of lighting is needed, and which visual details should remain natural.
Instead of using a short prompt such as:
"Realistic portrait of a man."
You can provide more specific instructions.
Example of a Better AI Photo Prompt
Basic prompt:
"Realistic portrait of a man."
Improved prompt:
"Create a realistic photographic portrait of an adult man standing near a large window in a softly lit room. Use natural daylight, realistic skin texture, subtle facial details, natural hair, accurate facial proportions, and soft shadows. Use a neutral background, realistic colors, and a natural expression. The image should resemble a photograph captured with a professional camera."
The improved prompt provides more information about lighting, texture, composition, and appearance.
This can help guide the image generation process toward a more natural result.
Important Elements to Include in a Realistic AI Photo Prompt
| Prompt Element | What It Helps Improve |
|---|---|
| Subject description | Defines the person or object |
| Lighting | Creates believable highlights and shadows |
| Skin texture | Reduces overly smooth skin |
| Facial details | Helps guide natural facial features |
| Camera perspective | Establishes a photographic viewpoint |
| Background | Creates a believable environment |
| Color tones | Helps maintain natural colors |
| Depth of field | Controls the appearance of background blur |
| Expression | Helps create a natural-looking face |
Use only the details that fit the image you want to create.
Adding too many conflicting instructions can make the result less consistent.
Use Natural Lighting in AI-Generated Photos
Lighting is one of the most important factors in realistic photography.
Even a well-designed AI portrait can look artificial if the lighting is too harsh, too bright, or inconsistent.
Natural-looking lighting can help create realistic skin tones, soft shadows, and believable depth.
Use Soft Window Light
Window light is a simple way to create a natural portrait.
It produces soft illumination that can help define facial features without creating extremely harsh shadows.
Example prompt:
"Create a realistic portrait of a person standing near a large window, illuminated by soft natural daylight. Use gentle shadows, realistic skin texture, and balanced exposure."
Use Outdoor Daylight
Outdoor daylight can create realistic portraits when the lighting is balanced.
Early morning or late afternoon light can produce softer shadows and warmer colors.
However, bright midday sunlight can also be realistic when the scene is designed appropriately.
Example prompt:
"Create a realistic outdoor portrait in natural daylight, with balanced exposure, believable shadows, natural skin tones, and a softly detailed background."
Avoid Conflicting Light Sources
A common realism problem occurs when the subject and background appear to be lit differently.
For example, a person's face may have warm sunlight while the surrounding room appears to have cool indoor lighting.
Different light sources can exist in real scenes, but their effects should remain visually consistent.
Example prompt:
"Use a single soft light source coming from the left side of the subject. Keep the highlights, shadows, and background lighting consistent with that direction."
How to Make AI-Generated Skin Look More Natural
Skin texture is one of the most noticeable features in realistic portraits.
If the skin looks too smooth, shiny, or artificial, the entire image may appear computer-generated.
The best approach is to preserve natural texture without exaggerating imperfections.
Use Natural Skin Texture in Prompts
When generating a portrait, describe the skin as natural and realistic.
You can use phrases such as:
- Natural skin texture.
- Subtle pores and fine details.
- Realistic skin tone variations.
- Soft and natural highlights.
- Balanced facial texture.
- No excessive skin smoothing.
These descriptions can guide the image generation process, although the final result depends on the tool and its settings.
Avoid Excessive Beauty Filters
Beauty filters can make skin appear unnaturally smooth.
If you are editing an existing AI photo, use skin smoothing carefully.
Try to preserve:
- Fine skin details.
- Natural facial lines.
- Subtle texture around the cheeks.
- Realistic highlights.
- Natural differences in skin tone.
Avoid applying the same smoothing level to the entire face.
Balance Texture and Sharpness
Adding too much texture can make skin look rough or exaggerated.
Similarly, excessive sharpening can make pores and fine details appear unnatural.
Use moderate adjustments and inspect the image at its intended display size.
A realistic portrait should look natural rather than artificially perfect.
How to Improve Facial Details in AI Photos
Facial details can strongly influence whether an AI-generated portrait looks believable.
Eyes, eyebrows, lips, teeth, and facial proportions should look consistent with the subject's expression and pose.
Improve the Eyes
When checking the eyes, look for:
- Natural alignment.
- Consistent gaze direction.
- Realistic reflections.
- Properly shaped eyelids.
- Balanced sharpness.
Avoid making the eyes excessively bright or glossy.
Improve the Lips and Teeth
AI-generated teeth may sometimes look unusually uniform or distorted.
Lips may also have unnatural edges or excessive shine.
To improve these details:
- Zoom in on the mouth.
- Check the shape of the lips.
- Look for unusual teeth or visible distortions.
- Use a localized correction tool if available.
- Review the result at normal viewing size.
Do not over-edit the mouth, as excessive changes can make the expression look unnatural.
Preserve Natural Facial Proportions
Avoid changing facial proportions too much during editing.
Unnecessary adjustments to the eyes, nose, jawline, or mouth can make a portrait look artificial.
If the original image contains major structural errors, regenerating the image may produce a more consistent result than trying to repair every detail manually.
How to Make AI-Generated Photos Look Like Real Camera Photos
A realistic AI-generated image often benefits from photographic composition and natural image characteristics.
However, simply adding camera settings to a prompt does not guarantee a realistic result.
Focus on the overall visual appearance.
Use a Natural Camera Perspective
Choose a camera viewpoint that suits the scene.
For example:
- Eye-level framing for a natural portrait.
- A wider view for environmental photography.
- A closer composition for facial details.
- A moderate background blur for portraits.
Avoid extreme perspectives unless they are intentional.
Use Realistic Depth of Field
Depth of field describes how much of an image appears in focus.
In portraits, the subject may be sharp while the background is slightly blurred.
However, excessive blur can make the subject look artificially separated from the environment.
Example prompt:
"Create a realistic portrait with the subject in clear focus and a softly blurred background. Keep the hair edges natural and maintain realistic depth of field."
Avoid Excessive Camera Effects
Too much artificial lens blur, extreme contrast, or heavy color grading can make an image look stylized rather than photographic.
Use these effects only when they suit the scene.
Part 2 will cover practical editing workflows, fixing common AI image problems, improving color and texture, and using enhancement tools carefully.
All Tools
- All Tools
- Remove Background from Image — Free & Private
- YouTube Thumbnail Enhancer
- Ecommerce Photo Optimizer
Part 2: Practical Ways to Make AI-Generated Photos Look More Realistic
How to Edit AI-Generated Photos to Look More Realistic
After generating an AI photo, you can improve its appearance through careful editing.
The goal is to correct unnatural details while preserving the original image's natural look.
You do not need to change everything. Sometimes, adjusting the lighting, reducing excessive sharpness, or correcting a few facial details is enough.
Here is a practical editing workflow you can follow.
Step 1: Choose a High-Quality Original Image
Start with the best version of your AI-generated photo.
A high-resolution image gives you more flexibility when editing facial details, textures, and colors.
Before editing, check whether the image has:
- Distorted facial features.
- Unnatural skin texture.
- Incorrect shadows.
- Blurry details.
- Strange background objects.
- Unnatural colors.
Identify the most noticeable problems first.
This helps you avoid making unnecessary changes.
Step 2: Correct the Lighting
If the image looks too bright, too dark, or unevenly lit, adjust its exposure and brightness.
You can also adjust highlights and shadows to improve the balance between light and dark areas.
For a natural appearance:
- Avoid extremely bright highlights on the face.
- Preserve details in darker areas.
- Keep the subject and background lighting consistent.
- Avoid making the entire image equally bright.
Make small adjustments and compare the result with the original.
Step 3: Improve Skin Texture
If the skin looks plastic or overly smooth, reduce excessive smoothing.
Depending on your editing tool, you may be able to use texture, clarity, or selective detail adjustments.
However, applying too much texture can make skin look rough.
Keep the skin natural and avoid exaggerated pores or artificial details.
Step 4: Correct Facial Details
Zoom in to inspect the eyes, lips, teeth, eyebrows, and hairline.
If a feature looks distorted, use a localized correction tool when possible.
Some editing tools offer object removal, inpainting, or selective image regeneration.
These features can help repair small problems without changing the entire image.
For major facial distortions, regenerating the image may be more effective than repeatedly editing it.
Step 5: Adjust Colors
AI-generated photos may have colors that look too strong or inconsistent.
Use color adjustments to make the image appear more natural.
Consider adjusting:
- Saturation.
- White balance.
- Contrast.
- Highlights.
- Shadows.
- Skin tone.
Avoid making skin tones excessively orange, pink, gray, or pale.
The best settings depend on the lighting and the style of the image.
Step 6: Apply Gentle Sharpening
Sharpening can help define details that appear slightly soft.
However, excessive sharpening may create artificial edges and make skin texture look unnatural.
Use a small adjustment and inspect the image at its intended display size.
If the image already looks sharp, you may not need additional sharpening.
Step 7: Review the Final Image
Before saving the photo, compare it with the original.
Check whether the editing has improved the image without introducing new problems.
Look for:
- Natural facial proportions.
- Consistent lighting.
- Realistic skin texture.
- Clean hair edges.
- Believable background details.
- Balanced colors.
If the edited image looks too polished or artificial, reduce the strength of the adjustments.
How to Fix Common Problems in AI-Generated Photos
AI-generated photos can contain several types of visual errors.
The best correction method depends on the problem.
Here are practical ways to address common issues.
1. Fix Plastic-Looking Skin
Plastic-looking skin is one of the most common problems in AI portraits.
It usually appears smooth, shiny, and lacking in natural texture.
Why it happens:
- The image generation process produces an overly polished appearance.
- Strong beauty filters remove skin texture.
- Excessive smoothing removes natural details.
- Lighting creates unnatural highlights.
How to fix it:
- Reduce excessive skin smoothing.
- Adjust highlights if the skin looks too shiny.
- Preserve natural skin texture.
- Use gentle detail enhancement if necessary.
- Avoid adding exaggerated pores.
The aim is to make the skin look believable rather than perfect.
2. Fix Unnatural Eyes
AI-generated eyes may sometimes look uneven, overly glossy, or incorrectly aligned.
These problems can make a portrait appear artificial.
How to fix it:
- Check the direction of the gaze.
- Inspect the shape of both eyes.
- Correct unnatural reflections.
- Look for distorted eyelids.
- Avoid making the eyes excessively bright.
If the eyes are severely distorted, consider regenerating the portrait with a clearer prompt.
3. Fix Strange Hands and Fingers
Hands are difficult to generate accurately in some AI images.
Common problems include extra fingers, merged fingers, unusual finger lengths, and unnatural hand positions.
How to fix it:
- Zoom in on the hands.
- Identify the distorted areas.
- Use a localized editing or inpainting tool if available.
- Describe the intended hand position clearly.
- Check that the corrected hand matches the original lighting and perspective.
For example, if the subject is holding a cup, specify how the fingers should wrap around the handle.
If the hand is heavily distorted, regenerating the image with a simpler pose may be easier.
4. Fix Unnatural Hair
AI-generated hair may look like a solid shape or contain strange strands.
Hair can also blend poorly with the background.
How to improve it:
- Preserve natural hair volume.
- Improve visible texture carefully.
- Check the edges around the head.
- Avoid excessive sharpening.
- Make sure the hair follows the subject's pose and lighting.
Do not add random strands everywhere. The result should remain consistent with the hairstyle.
5. Fix Unnatural Teeth and Lips
AI-generated mouths may contain uneven teeth, strange lip shapes, or excessive shine.
These details are especially noticeable in close-up portraits.
How to improve them:
- Check the shape of the lips.
- Inspect the teeth for distortions.
- Avoid making all teeth perfectly uniform.
- Keep lip highlights subtle.
- Preserve the subject's original expression.
If the mouth is severely distorted, regenerating the image may provide a more consistent result.
6. Fix Strange Background Objects
AI-generated backgrounds may contain objects with unusual shapes or inconsistent details.
Examples include distorted furniture, strange signs, and objects that appear to merge together.
How to fix the background:
- Identify the distracting object.
- Use an object removal or inpainting tool if available.
- Replace the object with a simple, believable alternative.
- Check perspective and lighting.
- Review the result at normal viewing size.
A simpler background can often make an image look more natural.
7. Fix Unnatural Shadows
Shadows help define the shape and position of objects.
If the shadows do not match the light source, the image may look artificial.
How to improve shadows:
- Identify the main light source.
- Check the direction of the shadows.
- Look for inconsistent shadows on the face and body.
- Reduce overly dark or harsh shadows when necessary.
- Keep the background lighting consistent with the subject.
Avoid removing all shadows, as this can make the subject appear flat.
How to Make AI-Generated Photos Look More Realistic With AI Upscaling
AI upscaling increases an image's pixel dimensions while using an AI model to estimate additional visual detail.
It can help make a small AI-generated photo more suitable for larger displays or certain editing tasks.
However, AI upscaling does not guarantee that the added details are accurate.
Some tools may generate new textures or modify small features.
When Should You Use AI Upscaling?
AI upscaling may be useful when:
- The original image is too small for your intended use.
- The photo looks slightly soft.
- You need a larger version for a website or display.
- You want to prepare an image for a higher-resolution layout.
It may be less useful when the image already has enough resolution or contains major structural errors.
Step-by-Step AI Upscaling Workflow
Step 1: Select the Original Image
Choose the highest-quality version of the AI-generated photo.
Avoid upscaling a heavily compressed or repeatedly edited copy if a better original is available.
Step 2: Choose an Upscaling Tool
Select an image enhancement tool that supports AI upscaling.
Check the available output dimensions and enhancement settings.
Step 3: Choose a Suitable Upscaling Level
Some tools offer options such as 2× or 4× enlargement.
The appropriate setting depends on the original image size and the intended output.
Avoid choosing the largest option automatically.
Step 4: Preview the Result
Check facial features, hair, clothing, and background details.
Look for artificial textures or unexpected changes.
Step 5: Make Small Corrections
If necessary, adjust sharpness, color, or contrast after upscaling.
Avoid excessive sharpening.
Step 6: Save the Final Image
Export the image in a suitable format and check that the file looks good at its intended display size.
Common AI Upscaling Mistakes
Avoid these mistakes when enhancing AI-generated photos:
- Upscaling a low-quality image too aggressively.
- Assuming that more pixels always mean more detail.
- Ignoring changes to facial features.
- Applying too much sharpening after upscaling.
- Saving the image with excessive compression.
Always compare the enhanced version with the original.
How to Make AI-Generated Photos Look More Realistic With Natural Colors
Color is an important part of realistic photography.
Even when an image has good facial details, unnatural colors can make it appear artificial.
The key is to maintain a balanced relationship between skin tones, lighting, and the surrounding environment.
1. Correct White Balance
White balance affects how warm or cool an image appears.
An image with incorrect white balance may look too yellow, too blue, or too green.
To improve white balance:
- Check neutral areas in the image.
- Adjust the temperature carefully.
- Correct unwanted color casts.
- Keep skin tones natural.
Do not assume that every realistic photo must have neutral or cool colors. Warm lighting can also look natural.
2. Reduce Excessive Saturation
Strong saturation can make colors look intense and artificial.
This may be especially noticeable in skin, clothing, and backgrounds.
Reduce saturation slightly if the colors appear too strong.
However, avoid making the image dull or gray.
3. Balance Contrast
Excessive contrast can remove details from shadows and highlights.
Very low contrast can make the image look flat.
Use moderate contrast to preserve details while maintaining a natural appearance.
4. Preserve Natural Skin Tones
Skin tones vary naturally between people and lighting conditions.
Avoid applying a single color adjustment that makes every face look the same.
Use selective color adjustments when necessary, and compare the result with the original image.
How to Make AI-Generated Photos Look More Realistic for Social Media
AI-generated photos are often used for social media posts, profile pictures, thumbnails, and promotional content.
The editing approach should match the platform and intended use.
For Instagram
For Instagram portraits and posts:
- Use a suitable image size for the intended placement.
- Keep skin texture natural.
- Avoid excessive filters.
- Check how the image looks on a mobile screen.
- Make sure important details are not cropped.
If the photo is intended for a profile picture, keep the subject clearly visible in the crop.
For Facebook
For Facebook posts and profile images:
- Use a clear, appropriately sized image.
- Avoid excessive compression.
- Check the crop before publishing.
- Keep facial details and background elements readable.
For YouTube Thumbnails
For YouTube thumbnails:
- Keep the main subject easy to recognize.
- Use clear lighting and balanced contrast.
- Avoid adding unnecessary details.
- Make sure the face remains natural at a smaller display size.
- Use text and graphic elements only when they support the thumbnail's purpose.
A thumbnail may need stronger contrast than a natural portrait, but excessive editing can still make the face look artificial.
For Professional Profile Pictures
For professional profile photos:
- Use a simple, believable background.
- Maintain natural facial proportions.
- Avoid excessive skin smoothing.
- Use realistic lighting.
- Keep clothing and accessories consistent with the intended setting.
If the image represents a real person, make sure any AI-generated changes do not misrepresent their appearance.
Best Practices for Making AI-Generated Photos Look Realistic
Follow these practical guidelines to improve your results.
Keep the Prompt Clear
Describe the subject, lighting, background, and desired photographic style.
Avoid adding too many conflicting instructions.
Focus on Natural Details
Prioritize realistic skin texture, facial proportions, lighting, and shadows.
These elements often matter more than excessive sharpness.
Avoid Over-Editing
Too much sharpening, smoothing, contrast, or saturation can make the image look artificial.
Make small adjustments and compare the result with the original.
Use a Simple Background
A simple background can reduce distracting visual errors.
It can also make the subject easier to see.
Inspect Important Details
Check the eyes, mouth, hands, hair, and background before finalizing the image.
Small errors can become more noticeable when the image is enlarged.
Keep the Original File
Save the original AI-generated photo before editing.
This allows you to compare versions and return to the original if necessary.
Be Transparent When Necessary
If an AI-generated image is presented in a context where viewers may reasonably believe it is a real photograph, consider clearly labeling it as AI-generated.
This is particularly important when the image depicts real people, events, or situations.
A Simple Workflow for Realistic AI-Generated Photos
If you want a straightforward process, follow these steps.
| Step | Action | Purpose |
|---|---|---|
| 1 | Generate the image with a clear prompt | Establish a realistic starting point |
| 2 | Check facial features and body proportions | Identify structural errors |
| 3 | Review lighting and shadows | Improve visual consistency |
| 4 | Correct skin texture | Avoid plastic-looking skin |
| 5 | Fix eyes, hands, and other details | Remove noticeable distortions |
| 6 | Adjust colors and contrast | Create a natural appearance |
| 7 | Upscale if necessary | Prepare the image for larger use |
| 8 | Apply gentle sharpening if needed | Improve perceived clarity |
| 9 | Compare the result with the original | Check for unwanted changes |
| 10 | Export the final image | Save a suitable version for your intended use |
You can skip steps that are not necessary for your image.
For example, if the original photo already has realistic skin texture and balanced lighting, you may only need to correct a small background issue.
The best results usually come from making a few careful improvements instead of applying every available effect.
Common Mistakes to Avoid When Making AI Photos Realistic
Mistake 1: Making Skin Too Smooth
Excessive smoothing removes natural texture and can make the face look artificial.
Better approach: Preserve subtle skin details and use gentle adjustments.
Mistake 2: Making Eyes Too Bright
Overly bright or glossy eyes can look unnatural.
Better approach: Keep reflections, highlights, and eye color consistent with the lighting.
Mistake 3: Adding Too Much Sharpness
Excessive sharpening creates harsh edges and exaggerated textures.
Better approach: Use moderate sharpening and inspect the image at normal size.
Mistake 4: Overusing AI Enhancement
AI enhancement can introduce details that were not present in the original image.
Better approach: Review the output carefully and compare it with the original.
Mistake 5: Ignoring Background Errors
A distorted background can make the entire image look artificial.
Better approach: Inspect the background and correct distracting inconsistencies.
Mistake 6: Changing Facial Proportions Too Much
Unnecessary facial edits can change the subject's appearance.
Better approach: Preserve natural proportions and make only the corrections that are needed.
Mistake 7: Using Too Many Filters
Combining multiple filters can produce unnatural colors and textures.
Better approach: Use a simple editing workflow with a clear goal.
Final Tips for Realistic AI-Generated Photos
Keep these points in mind when creating or editing AI photos:
- Use clear and detailed prompts.
- Choose natural lighting and believable backgrounds.
- Preserve realistic skin texture.
- Check eyes, teeth, hands, and hair.
- Keep colors balanced.
- Avoid excessive sharpening and smoothing.
- Use AI upscaling only when necessary.
- Compare the edited image with the original.
- Save a high-quality final version.
- Disclose AI generation when the context requires it.
Following these steps can help you create AI-generated photos that look more natural, balanced, and believable.
Part 3: Final Checklist, FAQs, and SEO Optimization
Final Checklist: How to Make AI-Generated Photos Look More Realistic
Before publishing or sharing your AI-generated photo, use this checklist to review its quality.
Image Quality Checklist
- Check the overall image quality.
- Make sure the photo has sufficient resolution.
- Remove noticeable visual distortions.
- Check that the image looks natural at its intended size.
- Avoid excessive sharpening and artificial textures.
Facial Details Checklist
- Check eye alignment and gaze direction.
- Inspect the lips and teeth.
- Make sure facial proportions look natural.
- Preserve realistic skin texture.
- Check hair edges and details.
Lighting and Color Checklist
- Make sure the lighting looks consistent.
- Check that shadows match the light source.
- Avoid overly bright highlights.
- Keep skin tones natural.
- Adjust saturation and contrast carefully.
Background Checklist
- Check for distorted objects.
- Make sure the background perspective looks believable.
- Remove distracting visual errors.
- Check that the subject blends naturally into the scene.
- Avoid excessive background blur.
Final Editing Checklist
- Keep a copy of the original image.
- Use AI upscaling only when necessary.
- Avoid excessive filters and enhancement effects.
- Compare the edited version with the original.
- Save the final image in a suitable format.
- Clearly disclose AI generation when appropriate.
Frequently Asked Questions (FAQs)
1. How do I make AI-generated photos look more realistic?
You can make AI-generated photos look more realistic by improving lighting, preserving natural skin texture, correcting facial details, adjusting colors, and fixing background distortions.
Use gentle editing and avoid excessive sharpening or smoothing.
2. Why do AI-generated photos look fake?
AI-generated photos may look artificial because of unnatural skin texture, distorted facial features, incorrect shadows, unusual hands, or unrealistic backgrounds.
Correcting these issues can improve the image's overall appearance.
3. How can I make AI-generated skin look natural?
Preserve subtle skin texture, reduce excessive smoothing, and avoid overly bright highlights.
Use gentle adjustments to maintain realistic skin tones and natural details.
4. How do I make AI-generated faces look realistic?
Check the eyes, lips, teeth, facial proportions, and skin texture.
Use localized editing tools to correct small errors, or regenerate the image if the facial structure is severely distorted.
5. How can I make AI-generated photos look like real camera photos?
Use natural lighting, believable composition, realistic textures, and balanced colors.
A natural camera perspective and moderate background blur can also help create a photographic appearance.
6. Does AI upscaling make AI photos more realistic?
AI upscaling can increase image dimensions and estimate additional visual detail.
However, it may introduce artificial textures or change small features. Always compare the enhanced image with the original.
7. How do I fix blurry AI-generated photos?
Start with the highest-quality original image available.
You can try gentle sharpening or AI upscaling if necessary, but excessive enhancement may create unnatural details.
8. How do I fix distorted hands in AI-generated photos?
Use a localized editing or inpainting tool to correct the affected area.
Describe the intended hand position clearly. If the distortion is severe, regenerating the image with a simpler pose may be more effective.
9. How do I make AI-generated eyes look more realistic?
Check eye alignment, gaze direction, reflections, and eyelid details.
Avoid excessive brightness or unnatural glossiness.
10. How can I make AI-generated hair look realistic?
Preserve natural hair volume, improve texture carefully, and check the edges around the head.
Avoid adding excessive sharpness or random strands that do not match the hairstyle.
11. Which lighting is best for realistic AI portraits?
Soft window light and balanced outdoor daylight can create natural-looking portraits.
The best lighting depends on the scene, subject, and intended photographic style.
12. Can I make AI-generated photos realistic for free?
Yes. Many free image editing tools offer basic color correction, cropping, sharpening, and other adjustments.
Some tools also provide free AI enhancement features, although availability and usage limits vary.
13. How do I remove the artificial look from an AI portrait?
Reduce excessive smoothing, correct unnatural colors, improve lighting consistency, and fix noticeable facial distortions.
Avoid applying too many filters or enhancement effects.
14. Can AI-generated photos look exactly like real photographs?
AI-generated photos can resemble real photographs, but visual realism does not guarantee that every detail is accurate.
Some images may contain subtle distortions or artificial details that are difficult to notice at first glance.
15. How do I make AI-generated photos look realistic for social media?
Use suitable image dimensions, natural-looking lighting, balanced colors, and realistic facial details.
Preview the image at the size it will appear on the platform and avoid excessive editing.
Ready to optimize your images?
Every tool mentioned in this article is free to use. No upload, no signup, and no watermarks — ever.
Try our free toolsRelated articles
10 AI Image Editing Tasks You Can Complete in Under 30 Seconds
Discover 10 everyday image editing tasks you can complete in under 30 seconds using AI. Remove backgrounds, enhance photos, resize, compress, convert formats, and more—all online.
7 Common Photo Editing Mistakes AI Can Fix Instantly in 2026
Learn the seven most common photo editing mistakes and discover how AI image editors can fix blurry photos, poor lighting, backgrounds, low resolution, and more within seconds.
How AI Background Removal Saves Hours of Editing Time in 2026
Discover how AI background removal helps creators, businesses, and photographers save hours of editing time by removing image backgrounds instantly with professional-quality results.